Illustrated cutting guide
Measure quilt borders and turn strip lengths into fabric
Border fabric starts with four strip lengths, not the area around the quilt. Measure the top you have, decide the finished border width, then include the fabric that disappears into the seams.
Measure the unfinished top in three places
Lay the top flat without pulling it. Measure length near both sides and through the centre; use the average for the two side strips. After attaching the sides, measure the new width in three places and average again for the top and bottom. Utah State University’s instructions use this sequence and recommend straight end joins with quarter-inch seams. Source: USU, Straight Grain Quilt Borders.
Match the ends and centre of each border to the quilt before sewing, distributing a small difference between pins. If the top is badly out of square, investigate that before using a border to force it flat. Krista Moser’s guide illustrates the three-measurement approach and centre pinning. Source: Krista Moser, Measuring For Borders.
Raw measurements and calculator inputs are different
Hypothetical walkthrough. Suppose the unfinished centre is a square-cut rectangle measuring 60.5 × 72.5 inches. All three length measurements are 72.5 inches in this example; all three widths are 60.5. You want a 4-inch finished straight border and use quarter-inch seams.
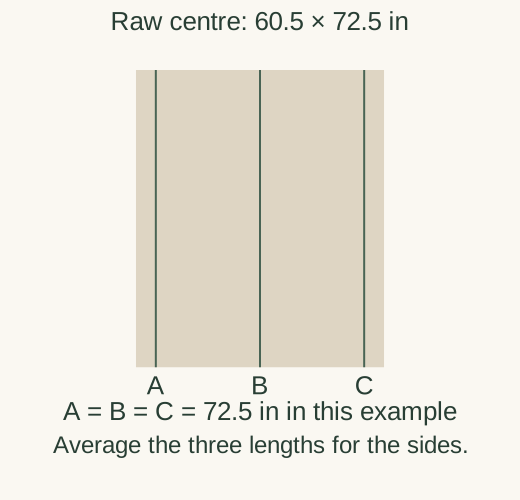
The border calculator uses the size inside the outer seam allowances. Subtract 0.25 inch from each opposite raw edge: enter 60 × 72 inches, not 60.5 × 72.5. It then adds the allowances to the cut lengths. A measured 72.5-inch side strip does not need another half inch added.
| Part | Calculation | Cut size or result |
|---|---|---|
| Strip width | 4 + 2 × 0.25 | 4.5 in |
| Each side strip | 72 + 2 × 0.25 | 72.5 in long |
| Each top/bottom strip | 60 + 2 × 4 + 2 × 0.25 | 68.5 in long |
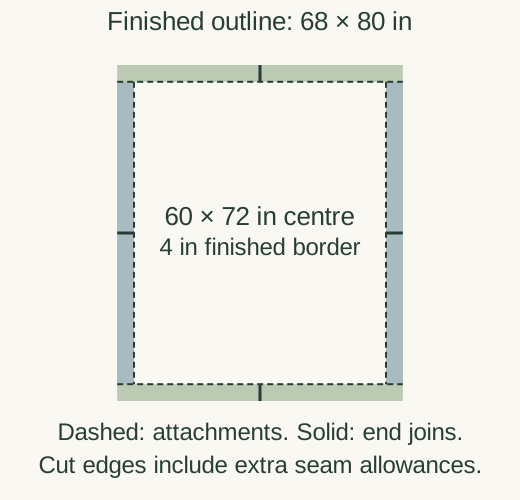
| Finished-equivalent quilt | 60 + 8 by 72 + 8 | 68 × 80 in |
| Still-unfinished outer edges | Add 0.25 in at each edge | 68.5 × 80.5 in |
Buy 1 yard for the conservative crosswise plan
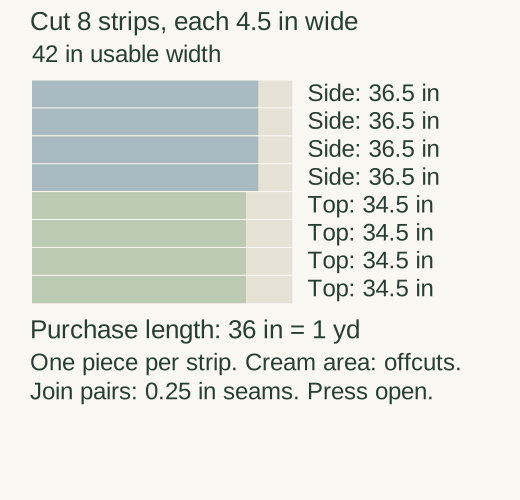
Assume 42 usable inches after selvedges and any washing. Neither full border length fits across that width. Each needs two pieces. We cut one piece from each full-width strip, with no attempt to pool offcuts.
| For | Pieces to cut | Join loss | Assembled cut length |
|---|---|---|---|
| Two sides | 4 pieces at 4.5 in × 36.5 in | 2 × 0.25 = 0.5 in per join | 36.5 + 36.5 − 0.5 = 72.5 in |
| Top and bottom | 4 pieces at 4.5 in × 34.5 in | 0.5 in per join | 34.5 + 34.5 − 0.5 = 68.5 in |
Eight crosswise strips × 4.5 inches of bolt length = 36 inches = 1 yd. There is no surplus from eighth-yard rounding at this exact boundary. In metres the calculated length is 0.9144 m, so a shop cutting in 0.1 m increments would supply 1 m. Add a deliberate allowance if you need to straighten ends, prewash, match a design or allow for mistakes.
Place the joins, then attach the borders
- Join two 36.5-inch pieces at their short ends with quarter-inch allowances; press open. Repeat for the other side. Each strip is 72.5 inches long, with its join 36.25 inches from either end.
- Match ends and centres and sew these two sides onto the top using quarter-inch seams. Press, then measure the width again. The predicted raw width is 68.5 inches; use your actual measured result for final trimming.
- Join two 34.5-inch pieces for each top/bottom border. The joins use 0.5 inch, leaving 68.5 inches per strip. Each join lies 34.25 inches from an end. Measure before final trimming, pin and sew top and bottom.
- Check the result flat. Its planned finished size is 68 × 80 inches; before the outside quarter-inch allowances are enclosed by finishing, its raw edges measure 68.5 × 80.5 inches.
Open this straight-border plan →
The calculator opens with this example’s measurements. Change them to suit your quilt.
When a lengthwise plan is worth the extra fabric
For this same border, four 4.5-inch lanes occupy 18 of the 42 usable inches. Cut two lanes 72.5 inches long and two 68.5 inches long from a 72.5-inch length of fabric. There are no end joins. The required bolt length is 72.5 inches = 2.014 yd, rounded to 2.125 yd (2⅛ yd), or 1.9 m.
This may suit a stripe that you want running along each border, or a preference for unpieced strips. It does not make a one-way motif face the same “up” on all four edges: top/bottom strips are turned relative to the sides. For a one-way picture print or matched border stripe, decide the orientation of each edge and reserve fabric for matching separately. The calculator compares quantity, not motif placement.
Before cutting a second border
Measure again after the first border is attached. Add borders in order from the centre out; each layer changes the next pair of lengths. Keep purchases separate if borders use different fabrics. The calculator’s widthwise plan is conservative: it does not reuse offcuts, share fabrics between layers or substitute diagonal end joins.
These instructions cover straight corners only. Mitred corners need tails and a different joining sequence; changing the calculator’s corner setting is not a reason to use the straight-corner cuts above. The border calculator’s method notes explain that separate scope.
Once the borders are sewn, measure the actual whole top for backing and binding. A longarm backing overhang is additional to the top size. Check your quilting service’s requirements; do not treat the border itself as backing allowance.