Illustrated cutting guide
Piece quilt backing from standard-width fabric
Start with the rectangle your quilting service needs, then work back to the pieces you can cut from the bolt. This walkthrough makes a simple, balanced-panel backing. It shows why two fabric widths are sometimes enough—and sometimes miss by a seam allowance.
Agree on the backing size before buying
Measure the entire quilt top, including borders. Ask the person doing the quilting how far the backing must extend on each side and whether they have seam preferences. Fat Quarter Shop describes 4–5 inches per side for longarm work, but that is guidance, not a promise that your service uses the same requirement. Source: Fat Quarter Shop’s backing guide.
Use the fabric’s usable width after selvedges and any prewashing. A 44- or 45-inch bolt label does not guarantee that much cuttable fabric. The 42-inch width below is an example input, not a deduction automatically applied to every bolt.
Worked example: a 60 × 80 inch quilt
Hypothetical walkthrough. We assume 42 usable inches, 0.5-inch seam allowance on each piece, 4 inches of backing beyond every edge, and a non-directional cotton. There is no motif matching or added shrinkage allowance.
| Measurement | In this example |
|---|---|
| Quilt top | 60 in × 80 in |
| Overhang | 4 in on each of four sides |
| Backing target | 60 + 8 by 80 + 8 = 68 in × 88 in |
| Available fabric width | 42 in after removing selvedges |
| Loss at each join | 1 in: 0.5 in from each piece |
The calculator compares full-length panels side by side with panels turned across the quilt. All panels in a layout have the same cut dimensions.
| Layout | Cut each panel: across × along bolt | Cut length to buy | Purchase in eighths |
|---|---|---|---|
| 2 panels · vertical seam | 34.5 in × 88 in | 2 × 88 = 176 in | 5 yd |
| 3 panels · horizontal seams | 30 in × 68 in | 3 × 68 = 204 in | 5.75 yd |
Cut the two-panel plan
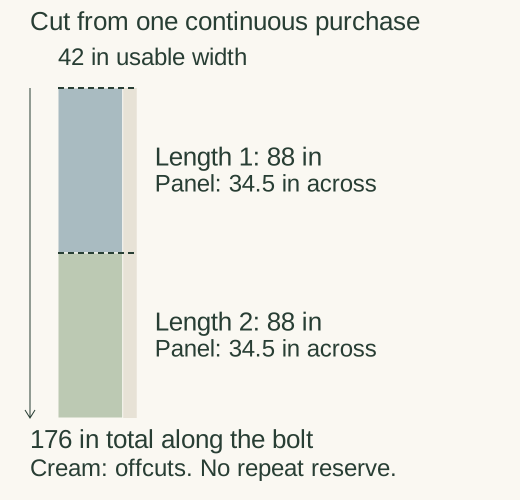
- Check that the entire purchase has at least 42 usable inches across it. Mark two 88-inch lengths along the bolt. Square the fabric before making the final cuts; buy extra if the ends need more trimming than the purchase surplus allows.
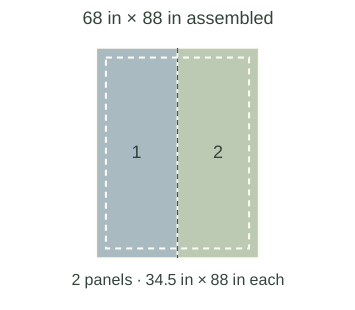
- From each length cut a 34.5 × 88 inch panel. The 34.5-inch dimension runs across the bolt. Each offcut is 7.5 × 88 inches, assuming the stated usable width and square cuts.
- Place the panels right sides together along their 88-inch edges. Sew with 0.5-inch allowances on both pieces. Press the seam open. Handi Quilter’s piecing instructions also describe half-inch backing seams and open pressing; confirm your service’s own preference. Source: Handi Quilter, simple backing method.
- The assembled rectangle is 68 in × 88 in: 34.5 + 34.5 − 1 = 68 inches wide. Its seam is 34 inches from the left edge. Centre the quilt top; the planned overhang is 4 inches all around.
What to ask for at the fabric counter
The panel lengths total 176 inches = 4.889 yd. Rounding up to the next eighth gives 5 yd (180 inches). The 4-inch difference is shop rounding. It is not a separately calculated allowance for washing, straightening or cutting mistakes.
If buying in metres, the same cut length is 4.4704 m; rounding to the next 0.1 m gives 4.5 m. Retailers may use different increments. If you plan to prewash, establish the width you will actually have after washing and add a length allowance appropriate to your fabric. More length cannot repair a panel plan that becomes too narrow.
Open this 60 × 80 backing plan →
The calculator opens with this example’s measurements. Change them to suit your quilt.
When the other layout makes sense
The horizontal alternative uses three 30 × 68 inch cuts. Turn them together so each runs 68 inches across the quilt. Two joins take up 2 inches: 30 + 30 + 30 − 2 = 88. The seams sit 29.5 and 58.5 inches from the top. Buy 5.75 yd before additional allowances. It uses more fabric here, but loading preferences or a print may justify it.
At a panel boundary, check the seams: two 42-inch widths joined with half-inch allowances cover 83 inches, not 84. An 84-inch target therefore needs three panels in that orientation.
This plan deliberately excludes scrap layouts, inset strips, crosswise motif matching and diagonal piecing. For an upright print, work through the directional backing guide before choosing. For modest widening of a non-directional fabric, the diagonal calculator offers a separate method with its own limits.