Illustrated cutting guide
Directional quilt backing: choose the layout before cutting
A layout can use less fabric and still put every bird, tree or word sideways. Check the print against the quilt’s intended top before accepting the cheapest backing result.
Mark what “up” means on your fabric
Unfold enough fabric to see the design. Identify the selvedges, the bolt’s length direction and the top of the motif. Do not assume those directions are interchangeable. A stripe can run either way; an upright motif can be printed across the width.
Place a paper arrow on the right side of the fabric and mark the quilt’s intended top. In the calculator choose either “Keep bolt length along quilt length” or “Keep bolt length along quilt width”, according to that actual fabric. The setting excludes a quarter-turn; it does not detect the print or arrange the motifs for you.
Handi Quilter advises checking the direction of all pieces and planning any pattern match before cutting. It also explains that seam orientation relative to a quilting frame can matter; ask whether your service can load the quilt sideways if necessary. Source: Handi Quilter, horizontal or vertical seams.
The same quilt, two different purchases
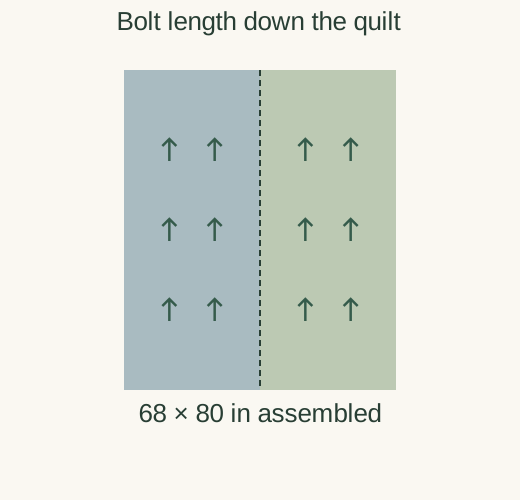
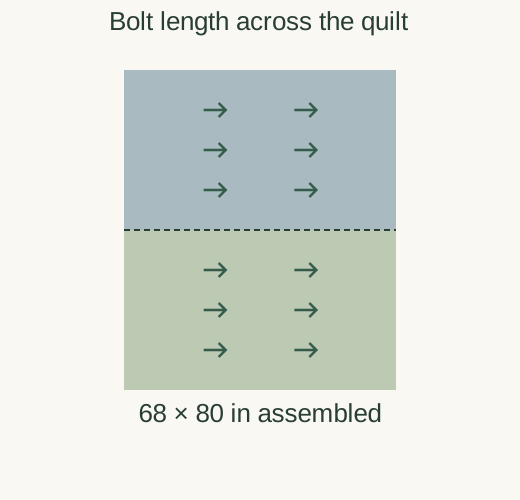
Hypothetical walkthrough. Our quilt top measures 60 in × 72 in. Four inches of overhang makes a 68 in × 80 in backing. The cotton has 42 usable inches, the seams use 0.5 inch per piece, and the invented print in these diagrams points along the bolt length. No motif matching is required yet.
| Choice | Across × along bolt for each panel | Total cut length | Buy before extra allowances |
|---|---|---|---|
| Keep the print upright | 2 at 34.5 in × 80 in | 160 in | 4.5 yd |
| Allow a quarter-turn | 2 at 40.5 in × 68 in | 136 in | 3.875 yd |
Cut and assemble the upright option
- Mark two 80-inch lengths down the bolt. Cut each panel 34.5 inches across its usable width. Do not turn one panel upside down to save a scrap.
- Lay both panels face up with their arrows pointing toward the quilt’s top. Their long 80-inch edges meet. Fold one onto the other so right sides touch, keeping the top ends together.
- Sew that long edge with 0.5-inch allowances. Press open and check the rectangle: 34.5 + 34.5 − 1 = 68 inches wide, by 80 long. The seam lies 34 inches from the left edge. This preserves direction, not an uninterrupted motif across the seam.
- Mark the top of the assembled backing for the quilter. Confirm the overhang and any requested seam placement. Fat Quarter Shop recommends communicating the top and centre when placement matters. Source: Fat Quarter Shop, pieced backing.
The upright cuts use 160 inches, or 4.444 yd; buy 4.5 yd (162 inches) when sold in eighths. The rotated plan uses 136 inches, or 3.778 yd; buy 3.875 yd (139.5 inches). That is a 24-inch difference in cutting length and a ⅝-yard difference after shop rounding. If buying in 0.1 m increments, the purchases are 4.1 m and 3.5 m, respectively.
For the rotated option, join the two 68-inch edges after turning both panels together. The assembled height is 40.5 + 40.5 − 1 = 80 inches. The horizontal seam lies 40 inches from the top. Accept this layout only if that print direction suits your project.
Open the upright-print plan →
The calculator opens with this example’s measurements. Change them to suit your quilt.
A repeat reserve is not a matching plan
Keeping a print upright and making its pattern continue across a seam are separate tasks. A half-inch seam can cut through a motif even when both panels face up. A large floral, stripe or plaid may need offsets or extra width as well as extra length.
With a 12-inch lengthwise repeat, our joined two-panel upright plan adds one repeat per panel: 2 × 12 = 24 inches reserved. The calculated purchase basis becomes 160 + 24 = 184 inches; round up to 5.125 yd (5⅛ yd), or 4.7 m. Those are buying reserves, not instructions to cut two 92-inch matched panels. Work out the motif positions on the whole piece before cutting the final panels.
The calculator cannot guarantee crosswise alignment, account for a half-drop repeat, or fix skewed printing. It adds no repeat reserve for a single seamless panel. If a centred motif or exact match is essential, lay it out with your quilter or pattern instructions and make a separate purchase plan.
Choose what matters for this quilt
- Upright words or figures: lock the correct bolt direction, even if the purchase is larger.
- A tossed print or solid: compare both orientations and check the service’s seam preferences.
- A wide backing: measure its usable width after any washing. One panel may eliminate joins, but print direction can still rule out rotation.
- A stripe used as a design line: decide whether it should run up the quilt or across it, then inspect the diagram and seam location.
No shrinkage or fabric-squaring percentage is built into these totals. Extra length does not compensate for a fabric width that shrinks below the required panel width. For the full cutting sequence without a print constraint, see piecing standard-width backing.